Drawing Elevations
This section covers how to create and edit elevations in an active job. If you're new to WinBidPro, we recommend reading through the Basic Workflow page first.
New Elevations
After you make new job, you'll get a prompt to make your first elevation. You can see more about that process on the Getting Started page.
While you're in a job, more elevations can be added by:
-
Clicking
Job>New Elevationin the main menu. -
Pressing
Ctrl+N -
Right-clicking in the
Job Explorerand selectingAdd New Elevation- Existing elevations can also be copied as a starting point for new elevations by right-clicking them in the
Job Explorerand selectingCopy Elevation.
- Existing elevations can also be copied as a starting point for new elevations by right-clicking them in the
New Elevation Options
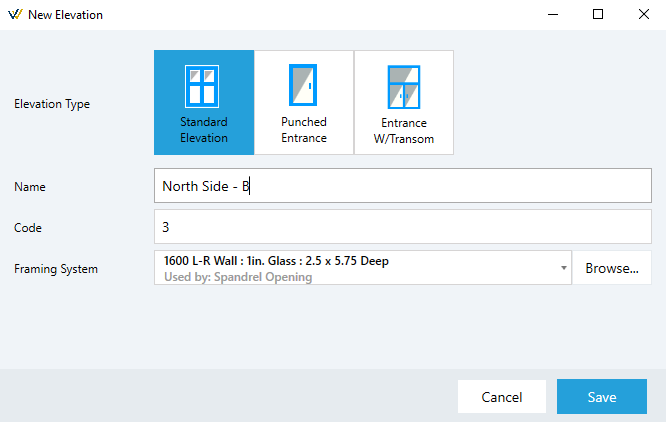
-
Elevation Type- A choice of Standard Elevation, Punched Entrance or Entrance w/ Transom.Standard Elevation- A glazed opening with options to add entrances, borrowed lites, etc. This covers most use cases.Punched Entrance- A punched opening meant for a framed door without transoms or sidelites.Entrance w/ Transom- A punched opening meant for a framed door and transom but without sidelites.
-
Mark- A unique mark for the elevation -- Also known as a tag or code.- You'll usually want this to match the system's tag in the drawing set.
-
Description- An optional description of the elevation. -
Framing System- The framing system to use with this elevation. -
Finish- The finish applied to your framing system. Defaults to the finish selected when you started the job. -
Labor Ruleset- The rules for estimating labor.
Drawing an Elevation
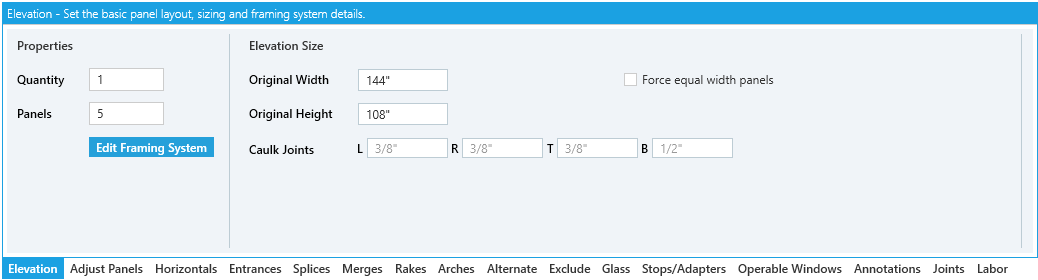
At the bottom of the screen you'll see your tool tabs. Each tab has different tools and settings to help define your elevations.
To start, use the Elevation tab to assign a minimum of one Panel, an Original Height and an Original Width to draw a preview of your elevation.
Once a preview is drawn, the other tool tabs will be unlocked.
Tool Tab Descriptions
You can find a brief description of each tool tab here. Click the corresponding page on the left for more details.
-
Elevation Tab- Set core details for the current elevation. Until these are set, the other tabs will not be available. -
Adjust Panels Tab- Add fixed height and width rules or a bulkhead (knee wall) to specific panels. -
Horizontals Tab- Manage add horizontal framing to your panels. -
Entrances Tab- Manage door frames and door leafs. -
Splices Tab- Manage splice locations. -
Merges Tab- Merge panels for irregular layouts. -
Rakes Tab- Manage raked elevations. -
Arches Tab- Manage arched elevations. -
Alternate Tab- Assign alternate parts to framing assemblies. -
Exclude Tab- Exclude specific frame segments and their parts from reports. -
Glass Tab- Assign glass products to panels. -
Stops / Adapters Tab- Assign glass stops and adapters to panels. -
Operable Windows Tab- Assign operable windows to panels. -
Annotations Tab- Add annotation text and leaders to elevations and drawings. -
Joints Tab- Joint are automatically assigned by the framing system configuration. Use this tab to review the assignments.- See Joint Configuration for details on joint assignment.
-
Labor Tab- Assign labor pricing rulesets and settings.